Back for the 5th week of #WorkoutWednesday and Andy has returned for a straightforward challenge. 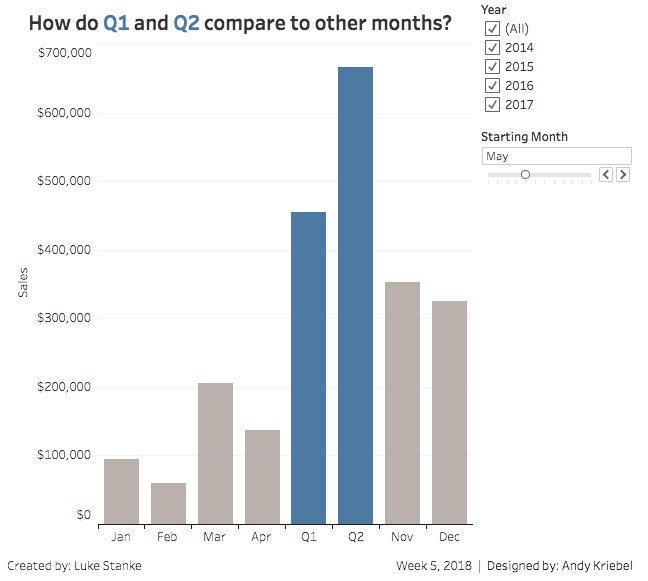
with the following requirements:
- No LOD
- No Table Calcs
- Q2 must always follow Q1 in the final viz
Alright so right off the bat, I can see that I’m gonna need to do some trickery here because while it may look like it’s a date dimension columns it can’t be because of the quarters. So it’s just gotta be a discrete dimension with a dynamic sort.
But those dynamic quarters…
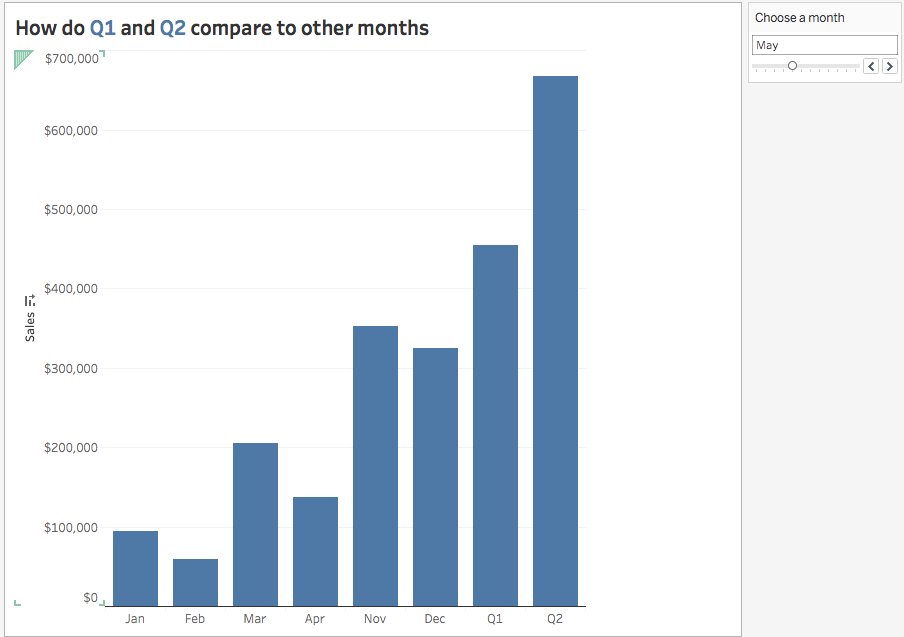
Looking at that the original viz, I can see that its parameter-driven where the user selects a month. That selection is the baseline for the two 3-month groups with the rest of the months separate. The graph is setup with the Months always being in the correct order with Q1 & Q2 next to each other.
So that tells me that I need to trick Tableau into thinking that the user selected month is the first month then setting all the remaining months after that then looping back around. So how do I do that?
Well, I know that the DATEPART() function in tableau assigns an integer (1-12) for each month so I think I should be able to use simple math to manipulate those numbers to create a new sequence. And once get the new sequence the rest of the challenge is grouping and aliasing based on the new sequence.
First up, let’s create a parameter for the user selected month.
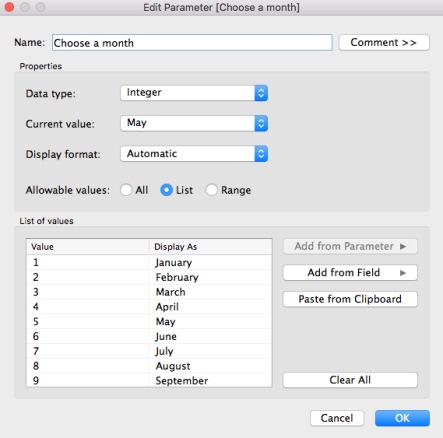
I’m setting it up as an integer parameter to match the datatype of our aforementioned DATEPART() values for each month of order date.
Now before I start creating the visual, I like to build out the calcs in a crosstab so I can see how everything’s working. Also, to make things a lot easier in my calculations, I’m going to create a calculated field for the DATEPART() values. There are two ways that you can go about this; one is the DATEPART() and the other is MONTH(). I tend to stick to the latter if i know I will only need that level of date. DATEPART() is used when I need to dynamically change the level of DATEPART() through a parameter. So my syntax looks like this:
MONTH([Order Date])
In my test/build worksheet, I’m going to also create a calculated field that returns the date name of each month. I’m going to do this so that I can visually check to make sure my parameter is working correctly. That syntax is fairly straightforward:
DATENAME(“month”,[Order Date])
Now that I’ve got my two fields let’s throw them both on rows with my integers first so that it auto sorts ascending. It should look like this.

Now for the offsetting…I mentioned that the user selected month is the first month. That’s easy to test.
IF [Choose a Month]=[Month] THEN 1 else [Month]+1 END
That would return a view like this

So the first part is working because May is 1 which is what I want. But now I need to get the rest of the numbers to follow after the 1 in the correct order.
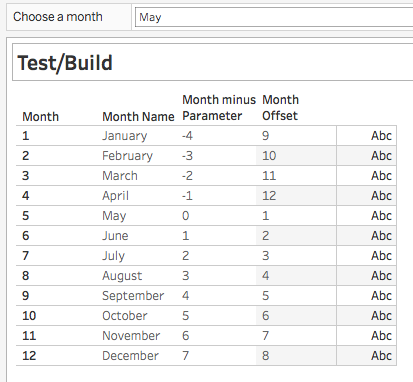
Now because both [Month] and [Choose a Month] are both integers, I could subtract one from the other. Let’s try this
[Month]–[Choose a Month]
That yields

Ooh, this looking better. My user selected month is at 0 and the months following are in consecutive order. Except when it comes back around but I think I can manipulate that with an IF statement because there are positive and negative numbers. So I will need to check if it’s less than 0, if so then I need to add 12 to [Month]–[Choose a Month] otherwise just return [Month]–[Choose a Month]. So that syntax will look like:
IF ([Month] – [Choose a month]) < 0
THEN 12 + ([Month] – [Choose a month])
ELSE ([Month] – [Choose a month])
END
That results in

Perfect! But I think just to keep everything on the up and up and I’m going to add ‘+1’ to end of my previous calc so that the counting starts at 1 as opposed to 0 since that’s easier to comprehend
IF ([Month] – [Choose a month]) < 0
THEN 12 + ([Month] – [Choose a month])
ELSE ([Month] – [Choose a month])
END +1
Now I’m cooking with gas! I think the hardest part is done. Now I need to group the [Month Offset] into three groups
- Q1
- Q2
- the rest of the months
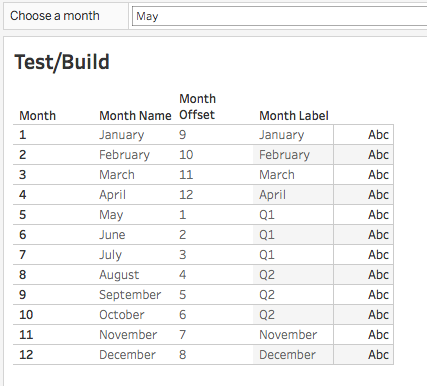
I’m going to use another IF statement to create the groups. Simple enough. When [Month Offset] is less than or equal to 3, that’s Q1, 4-6 will be Q2 and all others will the month name. Like this
IF [Month Offset]<=3 then “Q1”
ELSEIF [Month Offset]>3
AND [Month Offset]<=6 THEN “Q2”
ELSE [Month Name]
END
This will be my x-axis when I build the viz and looking at the original, I can see that Andy formatted the month names to just be the first letters so I’ll edit my calc above to do so.
IF [Month Offset]<=3 then “Q1”
ELSEIF [Month Offset]>3
AND [Month Offset]<=6 THEN “Q2”
ELSE LEFT([Month Name],3)
END

I think we’re ready to build a viz now!
Oh, that pesky sort! Okay, back to the drawing board. So I’ll still you use the [Month Offset] similar to how I used for the grouping. This time I’m going to use it to set integer for the Q1 and Q2 group and simply use the [Month] field for the rest of the field.
IF [Month Offset]<4 then [Choose a month]
elseif [Month Offset]<=6 then [Choose a month]+1
ELSE [Month]
END
And that looks like…

There it is!
Okay so now for color, I’ll simply create a set using [Month Label] with Q1 & Q2 included. and then throw that set on color and BOOM, DONE! Click the screenshot for the interactive view

I hope you enjoyed reading through my thought. Let me know if you what you thought or if you have any feedback. I intend to keep with this style for the rest of the #WorkoutWednesday challenges.
Until next time!